
In this tutorial, I will walk you through the process of installing Pubsubclient library for ESP8266, and help you understand a simple program for sending data to cloud MQTT.
Please read my tutorial series on IOT.
If you are new to MQTT, then I recommend, you read this article first.
So lets get started.
You can download the complete project from my github.
[wpi_designer_button text=’Download’ link=’https://github.com/arjunsk/esp8266-pubsubclient-cloudmqtt’ style_id=’48’ icon=’github’ target=’_blank’]
Part 1: Cloud MQTT
1. Create a Free Cloud MQTT account.
2. After going through the registration procedures, you need to create the cloud MQTT instance.
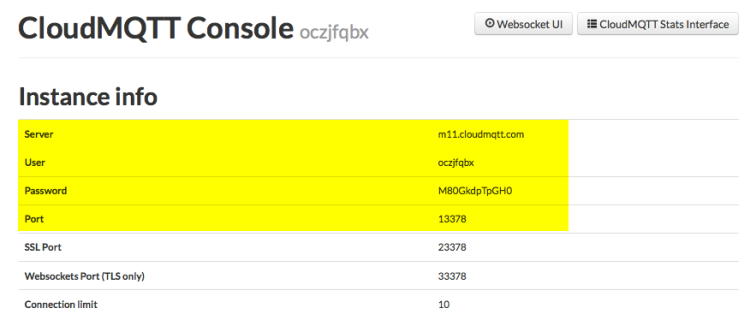
3. You will be presented with the following screen. Note down the highlighted.
Part 2: Arduino IDE
Here is a simple ESP8266 Program that uploads random numbers to the server. It also blinks the ESP blue LED, when it receives a -1 message.
1. Open the arduino IDE and copy paste the code.
Make sure to replace the data variables with your data.
#include <ESP8266WiFi.h>
#include <PubSubClient.h>   // Read the rest of the article
#include <stdlib.h>

const char *ssid =  "SSID";   // cannot be longer than 32 characters!
const char *pass =  "SSID_PASS";   //

const char *mqtt_server = "m11.cloudmqtt.com";
const int mqtt_port = 13378;
const char *mqtt_user = "oczjfgbx";
const char *mqtt_pass = "M80GkdpTpGH0";
const char *mqtt_client_name = "arduinoClient1"; // Client connections cant have the same connection name

#define BUFFER_SIZE 100

unsigned long previousMillis = 0;
const long interval = 10000;


WiFiClient wclient;  //Declares a WifiClient Object using ESP8266WiFi
PubSubClient client(wclient, mqtt_server,  mqtt_port);  //instanciates client object

//Function is called when, a message is recieved in the MQTT server.
void callback(const MQTT::Publish& pub) {
  Serial.print(pub.topic());
  Serial.print(" => ");
  if (pub.has_stream()) {
    uint8_t buf[BUFFER_SIZE];
    int read;
    while (read = pub.payload_stream()->read(buf, BUFFER_SIZE)) {
      Serial.write(buf, read);
    }
    pub.payload_stream()->stop();

    //Check if the buffer is -1
    if(buf[0]=='-' && buf[1]=='1'){
		//Code to blink the LED -- its strange that I can't blink the LED for more than 1sec.
       digitalWrite(LED_BUILTIN, HIGH);
       delay(1000);
       digitalWrite(LED_BUILTIN, LOW);
    }

    Serial.println("");
  } else
    Serial.println(pub.payload_string());
}


void setup() {
  // Setup console
  Serial.begin(115200);  //set the baud rate
  delay(10);
  Serial.println();
  Serial.println();
}

void loop() {
  if (WiFi.status() != WL_CONNECTED) {  //wifi not connected?
    Serial.print("Connecting to ");
    Serial.print(ssid);
    Serial.println("...");
    WiFi.begin(ssid, pass);

    if (WiFi.waitForConnectResult() != WL_CONNECTED)
      return;
    Serial.println("WiFi connected");
  }

  if (WiFi.status() == WL_CONNECTED) {
	//client object makes connection to server
    if (!client.connected()) {
      Serial.println("Connecting to MQTT server");
	  //Authenticating the client object
      if (client.connect(MQTT::Connect("mqtt_client_name")
                         .set_auth(mqtt_user, mqtt_pass))) {
        Serial.println("Connected to MQTT server");

		//Subscribe code
        client.set_callback(callback);
        client.subscribe("Temparture-sensor");

      } else {
        Serial.println("Could not connect to MQTT server");
      }
    }

    if (client.connected())
      client.loop();
  }

  SendTempHumid();  // this will send the dummy temparature reading
}

// Non-Blocking delay
void SendTempHumid(){
  unsigned long currentMillis = millis();

  if(currentMillis - previousMillis >= interval) {  // checks if 10 delay is over
    // save the last time you read the sensor
    previousMillis = currentMillis;

    srand(currentMillis); //create a random value based on time
    int h = rand()%100; // sets value between 0-99

    if (isnan(h)) {
      Serial.println("Failed to read from DHT sensor!");
      //return; This will ensure that data is always sent
    }

    Serial.print("Temparture-sensor");
    Serial.print(h);

    client.publish("Temparture-sensor",String(h) );
  }
}
2. You have to import the Pubsubclient Library for ESP8266. By default Arduino IDE has the Pubsubclient for Arduino Ethernet Shield. But this doesn’t work with ESP8266.
Download the pubsubclient files from here.
Copy paste the files from Pubsubclient folder into the Arduino’s library folder, like shown below.

Open up the serial monitor.
Upload the code onto ESP8266.
You can now see the logs, for the Wifi connection, MQTT connection and Temperature sensor values.
You can view the data online using the WebSocket console.
You can also send “-1” from the websocket console, to see the LED blinking.
In the next article, I will be discussing about the MQTT Ionic App, I build to monitor the data.
Please read my tutorial series on IOT.

Very clear instruction, but it seems we do not need , right?
LikeLike
It is most likely not needed. I used it for rand() function. Here i am sending random value as sensor output to CloudMQTT. You can modify it to send, sensor values.
LikeLike
excellent post..I followed your steps am facing issue when i am connecting paho client with cloudmqtt.
http://stackoverflow.com/questions/41999084/mqtt-websocket-connection-failed-in-cloudmqtt
LikeLike
1. I hope this websocket port : 39297
2. try changing client_1 to client_2 ( sometimes client_1 may already be connected in the first attempt )
3. Try it agian
Sorry, I faced this issue. But i don’t actually recall how it was resolved.
I bileave you should dig in stackoverflow.
LikeLike
Can not get this code to compile. I installed the library:
https://github.com/knolleary/pubsubclient
Any suggestions would be greatly appreciated!
Arduino: 1.8.2 (Windows 8.1), Board: “NodeMCU 1.0 (ESP-12E Module), 80 MHz, 115200, 4M (3M SPIFFS)”
MQTT_arjunsk_jun14:21: error: no matching function for call to ‘PubSubClient::PubSubClient(WiFiClient&, const char*&, const int&)’
PubSubClient client(wclient, mqtt_server, mqtt_port); //instanciates client object
LikeLike
You have to manually remove Pub_Sub library from that is installed in arduino IDE. Then open arduino IDE and manually install Pub_Sub library that has a name “Monroy” or something like that because the one that has a name “Nick O’Leary” doesn’t work with this example.
LikeLike
This doesn’t work. All 6 releases under 2.n are by Nick O’Leary and none of them have a PubSubClient call structure of WiFiClient&, const char*&, const int&.
So I don’t know how you got it to work because this code will never compile with this library.
https://pubsubclient.knolleary.net/api.html#PubSubClient1
LikeLike