This app will help you monitor sensor datas uploaded to cloud via MQTT and visualize it in the form of Spline.
Use-case scenario:
The app’s primary objective is to monitor elder peoples health condition from remote periodicaly. In-fact, we wanted to integrate more sensors in the device, like Temperature, GPS etc. This could also be integrated with Artificial Pace maker for patients. In a sense, this is a starter project that can be adapted to wider scopes.
Please read my tutorial series on IOT.
Libraries used:
- Eclipse Paho (MQTT javascript Library)
- HighChart (Used for displaying graph)
- Time (Used to get current time)
- Firebase (Used to save the subscribed device information, and user authentication)
You can download the complete project from my github.
[wpi_designer_button text=’Download’ link=’https://github.com/arjunsk/Ionic-IOT-Monitor’ style_id=’48’ icon=’github’ target=’_blank’]
NOTE :
1. We need to use websocket port for communicating to MQTT server using Eclipse Paho.
In Cloud MQTT :
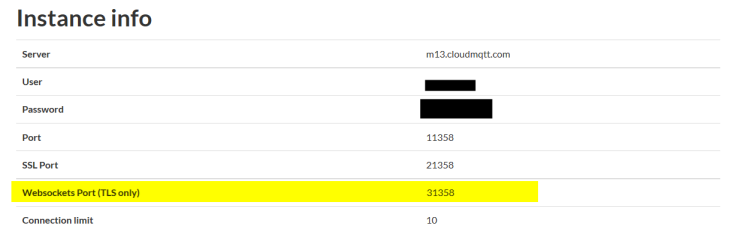
This is because
“The Paho JavaScript Client is an MQTT browser-based client library written in Javascript that uses WebSockets to connect to an MQTT Broker.”
Ionic :
INDEX PAGE
index.html

Replace the firebase variable with your credentials.
<!DOCTYPE html>
<html>
  <head>
    <meta charset="utf-8">
    <meta name="viewport" content="initial-scale=1, maximum-scale=1, user-scalable=no, width=device-width">
    <title></title>


	<!-- IF using Sass (run gulp sass first), then uncomment below and remove the CSS includes above
    <link href="css/ionic.app.css" rel="stylesheet">
    -->


    http://lib/ionic/js/ionic.bundle.js

    <!-- cordova script (this will be a 404 during development) -->
    http://cordova.js

    <link href="lib/ionic/css/ionic.css" rel="stylesheet">


<!--=========================================#1. Custom Header Part====================================-->
  <!-- MQTT.js-->
  http://lib/MQTT/mqttws31.js
  http://lib/MQTT/mqttws31-min.js

  <!-- Graph-->
  http://lib/Graph/Highchart/highcharts.js
  http://lib/Graph/Highchart/modules/exporting.js

  <!--Time-->
  http://lib/time/moment.min.js
  http://lib/time/moment-timezone-with-data.js

  <!-- Ionic Meterial Header-->
  http://lib/ionic-material/dist/ionic.material.min.js
  http://lib/ionicuirouter/ionicUIRouter.js
  <link href="lib/ionic-material/dist/ionic.material.min.css" rel="stylesheet">
  <link href="https://fonts.googleapis.com/css?family=RobotoDraft%3A400%2C500%2C700%2C400italic" rel="stylesheet">


  <!-- Additional Styles -->
  <link href="css/style.css" rel="stylesheet">


  <!--Firebase Header-->
  https://cdn.firebase.com/js/client/2.2.4/firebase.js
  https://cdn.firebase.com/libs/angularfire/1.2.0/angularfire.min.js

  https://www.gstatic.com/firebasejs/live/3.0/firebase.js
  <script>
    //#2.  Initialize Firebase
    // Refer to #2 in the article
    var config = {
	    apiKey: "API_KEY",
	    authDomain: "AUTH_DOMAIN",
	    databaseURL: "DB_URL",
	    storageBucket: "",
	    messagingSenderId: "SENDER_ID"
	  };
    firebase.initializeApp(config);
  </script>

<!--======================================================================================================-->


    <style type="text/css">
      .platform-ios .manual-ios-statusbar-padding{
        padding-top:20px;
      }
      .manual-remove-top-padding{
        padding-top:0px;
      }
      .manual-remove-top-padding .scroll{
        padding-top:0px !important;
      }
      ion-list.manual-list-fullwidth div.list, .list.card.manual-card-fullwidth {
        margin-left:-10px;
        margin-right:-10px;
      }
      ion-list.manual-list-fullwidth div.list > .item, .list.card.manual-card-fullwidth > .item {
        border-radius:0px;
        border-left:0px;
        border-right: 0px;
      }
    </style>

    http://js/app.js
    http://js/controllers.js
    http://js/routes.js
    http://js/services.js
    http://js/directives.js


  </head>
  <body ng-app="app" animation="slide-left-right-ios7">
  <div style="">

    <!--#5. indexCtrl -->
    <ion-side-menus  ng-controller="indexCtrl" data-componentid="side-menu21" style="" enable-menu-with-back-views="false">
        <ion-side-menu-content  >
            <ion-nav-bar class="bar-calm" >

                <ion-nav-back-button></ion-nav-back-button>


                <ion-nav-buttons side="left">
                    <!-- #3.  $root.extras -->
                    <button ng-if="$root.extras" class="button button-icon button-clear ion-navicon" menu-toggle="left">
                    </button>
                </ion-nav-buttons>


            </ion-nav-bar>
            <ion-nav-view></ion-nav-view>
        </ion-side-menu-content>

        <!-- #3.  $root.extras -->
        <ion-side-menu side="left" id="side-menu21" ng-if="$root.extras">

            <ion-header-bar class="expanded">
              <img ng-src="img/dp.png" class="avatar motion spin fade">
              <div class="menu-bottom">
                {{user_info.email}}
              </div>
            </ion-header-bar>

            <ion-content class="stable-bg has-expanded-header">
                <ion-list data-componentid="list1" class=" " id="menu-list1">

                    <ion-item data-componentid="list-item1" style="" menu-close="" ui-sref="topicsList" id="menu-list-item1" class="item-icon-left  ">
                        <i class="icon ion-ios-list-outline"></i>Subscribe List</ion-item>

                    <ion-item data-componentid="list-item8" style="" menu-close="" ui-sref="compareAll" id="menu-list-item8" class="item-icon-left  ">
                        <i class="icon ion-stats-bars"></i>Compare All</ion-item>

                    <ion-item data-componentid="list-item5" style="" menu-close="" ui-sref="settings" id="menu-list-item5" class="item-icon-left  ">
                        <i class="icon ion-ios-gear-outline"></i>Settings</ion-item>

                    <ion-item data-componentid="list-item6" style="" menu-close="" ui-sref="support" id="menu-list-item6" class="item-icon-left  ">
                        <i class="icon ion-ios-help-outline"></i>Support</ion-item>

                    <ion-item ng-click="logout()" data-componentid="list-item7" style="" id="menu-list-item7" class="item-icon-left  ">
                        <i class="icon ion-log-out"></i>Logout</ion-item>

                </ion-list>
            </ion-content>

        </ion-side-menu>
    </ion-side-menus>
  </div>
  </body>
</html>
app.js
- Make sure, that you include firebase in the app.js.
- Also add $rootscope.extra //used for hiding authentic user elements
angular.module('app', ['ionic', 'app.controllers', 'app.routes', 'app.services', 'app.directives',
                       'firebase'])
.config(function($ionicConfigProvider) {
    //Added config
    //$ionicConfigProvider.views.maxCache(5);
    $ionicConfigProvider.scrolling.jsScrolling(false);
    $ionicConfigProvider.tabs.position('bottom'); // other values: top
})
.run(function($ionicPlatform,$rootScope) {

    $rootScope.extras = false;

  $ionicPlatform.ready(function() {
    // Hide the accessory bar by default (remove this to show the accessory bar above the keyboard
    // for form inputs)
    if (window.cordova && window.cordova.plugins && window.cordova.plugins.Keyboard) {
      cordova.plugins.Keyboard.hideKeyboardAccessoryBar(true);
      cordova.plugins.Keyboard.disableScroll(true);
    }
    if (window.StatusBar) {
      // org.apache.cordova.statusbar required
      StatusBar.styleDefault();
    }
  });
})
Controller.js
I created a custom controller for index page, to check the user login status.
Make sure you make the ng-controller for index.html as
<ion-side-menus ng-controller="indexCtrl"
In the controller add the following,
.controller('indexCtrl', function($scope,$rootScope,sharedUtils,$ionicHistory,$state,$ionicSideMenuDelegate) {

    //Check if user already logged in
    firebase.auth().onAuthStateChanged(function(user) {
      if (user) {
        $scope.user_info=user; //Saves data to user_info
      }else {

        $ionicSideMenuDelegate.toggleLeft(); //To close the side bar
        $ionicSideMenuDelegate.canDragContent(false);  // To remove the sidemenu white space

        $ionicHistory.nextViewOptions({
          historyRoot: true
        });
        $rootScope.extras = false;
        sharedUtils.hideLoading();
        $state.go('tabsController.login', {}, {location: "replace"});

      }
    });

    $scope.logout=function(){

      sharedUtils.showLoading();

      // Main Firebase logout
      firebase.auth().signOut().then(function() {

        $ionicSideMenuDelegate.toggleLeft(); //To close the side bar
        $ionicSideMenuDelegate.canDragContent(false);  // To remove the sidemenu white space

        $ionicHistory.nextViewOptions({
          historyRoot: true
        });


        $rootScope.extras = false;
        sharedUtils.hideLoading();
        $state.go('tabsController.login', {}, {location: "replace"});

      }, function(error) {
        sharedUtils.showAlert("Error","Logout Failed")
      });

    }

  })
LOGIN / SIGNUP PAGE
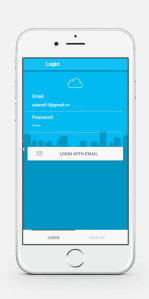
login.html
<ion-view style="" class=" " id="page5" title="Login">
    <ion-content class="has-header" padding="true" style="background: url(img/bg1.jpg) center; background-size: cover;">


		<form name="loginForm" class="list " id="login-form1">
            <ion-list class=" " id="login-list2">

                <div class="app-icon"></div>

                <label class="item item-input item-floating-label">
                    <span class="input-label" style="color: #fffcfd;">Email</span>
                    <input ng-model="user.email" style="color: white;" type="email" placeholder="Email">
                </label>
                <label class="item item-input item-floating-label">
                    <span class="input-label" style="color: #fffcfd;" >Password</span>
                    <input ng-model="user.password" style="color: white;" type="password" placeholder="Password">
                </label>

            </ion-list>

            <div style="height: 40px;" class="spacer"></div>
            <button ng-click="loginEmail(loginForm,user)" class=" button button-stable  button-block  icon-left ion-ios-email-outline "  id="signup-button3">LOGIN WITH EMAIL</button>
    </form>

	</ion-content>
</ion-view>
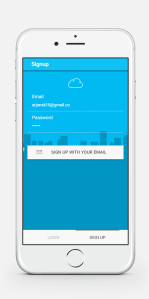
signup.html
<ion-view style="" class=" " id="page6" title="Signup">
    <ion-content class="has-header" padding="true" style="background: url(img/bg1.jpg) center; background-size: cover;">
        <form name="signupForm" class="list " id="signup-form2">
            <ion-list class=" " id="signup-list3">

			   <div class="app-icon"></div>

              <label class="item item-input item-floating-label">
                  <span style="color: #fffcfd;" class="input-label">Email</span>
                  <input style="color: #ffffff;" ng-model="user.email" type="email" placeholder="Email">
              </label>

              <label class="item item-input item-floating-label">
                  <span style="color: #fffcfd;" class="input-label">Password</span>
                  <input style="color: #ffffff;" ng-model="user.password" type="password" placeholder="Password">
              </label>


            </ion-list>
            <div style="width: 279px; height: 35px;" class="spacer"></div>
            <button ng-click="signupEmail(signupForm,user)" class=" button button-stable  button-block  icon-left ion-ios-email-outline " style="border-radius:0px 0px 0px 0px;" id="signup-button3">SIGN UP WITH YOUR EMAIL</button>
        </form>
    </ion-content>
</ion-view>
Controller.js
loginCtrl
.controller('loginCtrl', function($scope,$rootScope,$ionicHistory,sharedUtils,$state,$ionicSideMenuDelegate) {
    $rootScope.extras = false;  // For hiding the side bar and nav icon

    // When the user logs out and reaches login page,
    // we clear all the history and cache to prevent back link
    $scope.$on('$ionicView.enter', function(ev) {
      if(ev.targetScope !== $scope){
        $ionicHistory.clearHistory();
        $ionicHistory.clearCache();
      }
    });

    //Check if user already logged in
    firebase.auth().onAuthStateChanged(function(user) {
      if (user) {

        $ionicHistory.nextViewOptions({
          historyRoot: true
        });
        $ionicSideMenuDelegate.canDragContent(true);  // Sets up the sideMenu dragable
        $rootScope.extras = true;
        sharedUtils.hideLoading();
        $state.go('topicsList', {}, {location: "replace"});

      }
    });


    $scope.loginEmail = function(formName,cred) {


      if(formName.$valid) {  // Check if the form data is valid or not

        sharedUtils.showLoading();

        //Email
        firebase.auth().signInWithEmailAndPassword(cred.email,cred.password).then(function(result) {

            // You dont need to save the users session as firebase handles it
            // You only need to :
            // 1. clear the login page history from the history stack so that you cant come back
            // 2. Set rootScope.extra;
            // 3. Turn off the loading
            // 4. Got to menu page

            $ionicHistory.nextViewOptions({
              historyRoot: true
            });
            $rootScope.extras = true;
            sharedUtils.hideLoading();
            $state.go('topicsList', {}, {location: "replace"});

          },
          function(error) {
            sharedUtils.hideLoading();
            sharedUtils.showAlert("Please note","Authentication Error");
          }
        );

      }else{
        sharedUtils.showAlert("Please note","Entered data is not valid");
      }

    };

  })
signupCtrl
.controller('signupCtrl', function($scope,$rootScope,sharedUtils,$ionicSideMenuDelegate,
                                     $state,fireBaseData,$ionicHistory) {
    $rootScope.extras = false; // For hiding the side bar and nav icon

    $scope.signupEmail = function (formName, cred) {

      if (formName.$valid) {  // Check if the form data is valid or not

        sharedUtils.showLoading();

        //Main Firebase Authentication part
        firebase.auth().createUserWithEmailAndPassword(cred.email, cred.password).then(function (result) {

          //Registered OK
          $ionicHistory.nextViewOptions({
            historyRoot: true
          });
          $ionicSideMenuDelegate.canDragContent(true);  // Sets up the sideMenu dragable
          $rootScope.extras = true;
          sharedUtils.hideLoading();
          $state.go('topicsList', {}, {location: "replace"});

        }, function (error) {
          sharedUtils.hideLoading();
          sharedUtils.showAlert("Please note","Sign up Error");
        });

      }else{
        sharedUtils.showAlert("Please note","Entered data is not valid");
      }

    }

  })
Before we discuss further, let us see the code for
service.js
angular.module('app.services', [])


.factory('fireBaseData', function($firebase) {
  var ref = new Firebase("https://mqtt-example.firebaseio.com/"),
  refMqtt = new Firebase("https://mqtt-example.firebaseio.com/mqtt");
  return {
    ref: function() {
      return ref;
    },
    refMqtt: function() {
      return refMqtt;
    }
  }
})

.factory('sharedUtils',['$ionicLoading','$ionicPopup', function($ionicLoading,$ionicPopup){


    var functionObj={};

    functionObj.showLoading=function(){
      $ionicLoading.show({
        content: '<i class=" ion-loading-c"></i> ', // The text to display in the loading indicator
        animation: 'fade-in', // The animation to use
        showBackdrop: true, // Will a dark overlay or backdrop cover the entire view
        maxWidth: 200, // The maximum width of the loading indicator. Text will be wrapped if longer than maxWidth
        showDelay: 0 // The delay in showing the indicator
      });
    };
    functionObj.hideLoading=function(){
      $ionicLoading.hide();
    };


    functionObj.showAlert = function(title,message) {
      var alertPopup = $ionicPopup.alert({
        title: title,
        template: message
      });
    };

    return functionObj;

}])

.factory('BlankFactory', [function(){

}])

.service('BlankService', [function(){

}]);
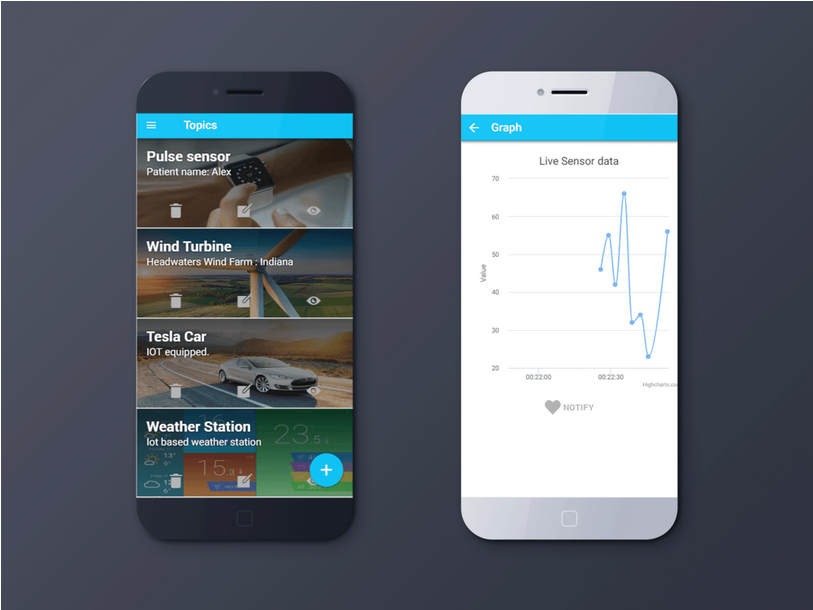
Topics: 
topics-list.html
<ion-view style="" class=" " id="page9" title="Topics">
<ion-content class="has-header" padding="false">
<div ng-repeat="item in topics" style=" margin-bottom: 0;" class="list condensed-space no-padding">
<div class="card dark-bg in" >
<a class="item clear-bg item-bg-image waves-effect waves-button waves-light has-mask-reverse">
<h2>{{item.topic}}</h2>
<p>{{item.info}}</p>
<div class="button-bar" style="bottom: 0;position: absolute;right: 0;">
<button ng-click="deleteTopic(item.$id)" class="button button-large button-clear flat waves-effect waves-button waves-light icon ion-android-delete pull-right text-white"></button>
<button ng-click="itemManipulation(item)" class="button button-large button-clear flat waves-effect waves-button waves-light icon ion-ios-compose pull-right text-white"></button>
<button ng-click="view_graph(item.topic)" class="button button-large button-clear flat waves-effect waves-button waves-light icon ion-ios-eye pull-right text-white"></button>
</div>
<img ng-src="{{'img/'+ item.img +''}}" >
</a>
</div>
</div>
</ion-content>
<button ng-click="itemManipulation()" class="button button-fab button-fab-bottom-right button-calm icon ion-plus waves-effect waves-button waves-light"></button>
</ion-view>
Controller.js [ topicsCtrl ]
We are going to load the list of topics from the firebase database.
This page also contains: add, delete and update functionalities.
 .controller('topicsCtrl', function($scope,$rootScope,$ionicSideMenuDelegate,
                                     fireBaseData,$state,$ionicPopup,$firebaseObject,
                                     $ionicHistory,$firebaseArray,sharedUtils) {

    //Check if user already logged in
    sharedUtils.showLoading();
    firebase.auth().onAuthStateChanged(function(user) {
      if (user) {
        $scope.user_info=user;
        $scope.topics= $firebaseArray(fireBaseData.refMqtt().child(user.uid).child("topics"));

        $scope.topics.$loaded().then(function(data) {   //Calls when the firebase data is loaded
          sharedUtils.hideLoading();
        }, 500);

      }else {

        $ionicSideMenuDelegate.toggleLeft(); //To close the side bar
        $ionicSideMenuDelegate.canDragContent(false);  // To remove the sidemenu white space

        $ionicHistory.nextViewOptions({
          historyRoot: true
        });
        $rootScope.extras = false;
        sharedUtils.hideLoading();
        $state.go('tabsController.login', {}, {location: "replace"});
        sharedUtils.hideLoading();
      }
    });

    // On Loggin in to menu page, the sideMenu drag state is set to true
    $ionicSideMenuDelegate.canDragContent(true);
    $rootScope.extras=true;

    // When user visits A-> B -> C -> A and clicks back, he will close the app instead of back linking
    $scope.$on('$ionicView.enter', function(ev) {
      if(ev.targetScope !== $scope){
        $ionicHistory.clearHistory();
        $ionicHistory.clearCache();
      }
    });

    //Edit section
    $scope.itemManipulation = function(edit_val) {  // Takes care of item add and edit ie Item Manipulator
      var title,sub_title;
      if(edit_val!=null) {
        $scope.data=null;
        $scope.data = edit_val; // For editing address
        title="Edit Topic";
        sub_title="Edit your Topic";
      }
      else {
        $scope.data = {};    // For adding new address
        title="Add Topic";
        sub_title="Add a new topic";
      }
      // An elaborate, custom popup
      var connectionPopup = $ionicPopup.show({
        template: '<input type="text"   placeholder="Topic"  ng-model="data.topic"> <br/> ' +
                  '<input type="text"   placeholder="Info" ng-model="data.info"> <br/> '+
                  '<input type="text"   placeholder="Image (Optional)"  ng-model="data.img"> <br/> ',
        title: title,
        subTitle: sub_title,
        scope: $scope,
        buttons: [
          { text: 'Close' },
          {
            text: '<b>Save</b>',
            type: 'button-positive',
            onTap: function(e) {
              if ( !$scope.data.topic || !$scope.data.info  ) {
                e.preventDefault(); //don't allow the user to close unless he enters full details
              } else {
                return $scope.data;
              }
            }
          }
        ]
      });

      connectionPopup.then(function(res) {

        if(edit_val!=null) {
          //Update  address
          if(res!=null) { //res == null => close()
            if(!res.img){ res.img="topic_bg_default.jpg";  }
            fireBaseData.refMqtt().child($scope.user_info.uid).child("topics").child(edit_val.$id).update({    // set
              topic: res.topic,
              info: res.info,
              img:res.img
            });
          }
        }else{
          //Add new address
          if(res!=null) {
            if (!res.img) {res.img = "topic_bg_default.jpg";}
            fireBaseData.refMqtt().child($scope.user_info.uid).child("topics").push({    // set
              topic: res.topic,
              info: res.info,
              img: res.img
            });
          }
        }

      });

    };

    // A confirm dialog for deleting topic
    $scope.deleteTopic = function(del_id) {
      var confirmPopup = $ionicPopup.confirm({
        title: 'Delete Topic',
        template: 'Are you sure you want to delete this topic',
        buttons: [
          { text: 'No' , type: 'button-stable' },
          { text: 'Yes', type: 'button-assertive' , onTap: function(){return del_id;} }
        ]
      });

      confirmPopup.then(function(res) {
        if(res) {
          fireBaseData.refMqtt().child($scope.user_info.uid).child("topics").child(res).remove();
        }
      });
    };

    $scope.view_graph=function(c_id){
      fireBaseData.refMqtt().child($scope.user_info.uid).update({ currentTopic: c_id }); //set the current topic
      $state.go('graph', {}, {location: "replace"}); //move to graph page
    };

  })
SETTINGS :
We use this page to save and update the MQTT broker credentials.

settings.html
<ion-view style="" class=" " id="page12" title="Settings">
    <ion-content class="has-header" padding="false"  >

      <form name="settingForm" class="list " id="settings-form">

        <ion-list>

          <label class="item item-input ic-selected">
            <a class="icon icon-right ion-android-cloud" style="margin-right: 10px;"></a>
            <input style="color: #000;" ng-model="mqtt.url" type="text" placeholder="Broker URL" >
            <ion-toggle style="width: 0;margin: 0;"  ng-model="mqtt.ssl" ng-checked="mqtt.ssl"></ion-toggle>
          </label>

          <label class="item item-input ic-selected">
            <a class="icon icon-right ion-ios-cog" style="margin-right: 10px;"></a>
            <input style="color: #000;" ng-model="mqtt.port" type="text"  placeholder="Port (Use websocket port)">
          </label>

          <label class="item item-input ic-selected">
            <a class="icon icon-right ion-android-contact" style="margin-right: 10px;"></a>
            <input style="color: #000;" ng-model="mqtt.username" type="text" placeholder="Username (Optional)">
          </label>

          <label class="item item-input ic-selected">
            <a class="icon icon-right ion-locked" style="margin-right: 10px;"></a>
            <input style="color: #000;" ng-model="mqtt.password" type="password" placeholder="Password (Optional)">
          </label>

        </ion-list>

      </form>
    </ion-content>

    <div id="footer" class="button-bar"  >
      <a style="min-width: 50%;border-radius: 0px;" ng-click="cancel()" class="button button-lite icon-left ion-close">Cancel</a>
      <a style="min-width: 50%;border-radius: 0px;" ng-click="save(mqtt)"  class="button button-calm icon-left ion-checkmark">Save</a>
    </div>
  <!-- </ion-footer-bar>  -->

</ion-view>
Controller.js [ settingsCtrl ]
.controller('settingsCtrl', function($scope,$rootScope,fireBaseData,$firebaseObject,
                                       $ionicPopup,$state,$window,$firebaseArray,
                                       sharedUtils) {
    //Bugs are most prevailing here
    $rootScope.extras=true;
    //Shows loading bar
    sharedUtils.showLoading();
    //Check if user already logged in
    firebase.auth().onAuthStateChanged(function(user) {
      if (user) {
        $scope.mqtt= $firebaseObject(fireBaseData.refMqtt().child(user.uid));
        $scope.user_info=user; //gives user id

        $scope.mqtt.$loaded().then(function(data) {   //Calls when the firebase data is loaded
          sharedUtils.hideLoading();
        }, 500);

      }
    });


    $scope.save= function (mqttRef) {

      if(mqttRef.username=="" || mqttRef.username==null){
        mqttRef.username="";
        mqttRef.password="";
      }
      client_id="myClientId" + new Date().getTime();
      if( (mqttRef.url!="" && mqttRef.url!=null ) &&
          (mqttRef.port!="" && mqttRef.port!=null )
        ){
        fireBaseData.refMqtt().child($scope.user_info.uid).update({
          url: mqttRef.url,
          port: mqttRef.port,
          username: mqttRef.username,
          password: mqttRef.password,
          ssl: mqttRef.ssl,
          clientId:client_id,
          currentTopic:""
        });
      }

    };

    $scope.cancel=function(){
      $window.location.reload(true);
    }

  })
GRAPH :
This is the place where we get real time data visualisation. Here we are taking getting heart rate every 10 seconds. I have used highchart library to configure a spline graph.

graph.html
<ion-view   id="page7" title="Graph">
    <ion-content class="has-header" padding="true"  >

      <div id="container"
           style="min-width: 310px;
                  height: 400px;
                  margin: 0 auto">
       </div>

      <div class="list">
        <button style="width: 100%;" ng-click="notify()"
                class="button button-large button-clear flat
                         waves-effect waves-button waves-light
                         icon ion-heart pull-right text-white">
          Notify
        </button>
      </div>


    </ion-content>
</ion-view>
controller.js [ graphCtrl ]
.controller('graphCtrl', function($scope,$rootScope,fireBaseData,
                                    $firebaseObject,sharedUtils) {

    sharedUtils.showLoading(); // starts with loading bar

    /*--------------------------------FIREBASE---------------------------*/
    $rootScope.extras=true;
    //var mqttData;
    firebase.auth().onAuthStateChanged(function(user) {
      if (user) {
        mqttData=$firebaseObject(fireBaseData.refMqtt().child(user.uid));  //Mqtt data
        mqttData.$loaded().then(function(data) {   //Calls when the firebase data is loaded
            $scope.MQTTconnect();
          }, 500);

      }
    });
    /*--------------------------------END OF FIREBASE---------------------------*/


    /*--------------------------------MQTT---------------------------*/
    //MQTT variables
    var client;
    var reconnectTimeout = 2000;

    $scope.MQTTconnect=function() {

      console.log("START");
      client = new Paho.MQTT.Client(
        mqttData.url,
        Number(mqttData.port),
        mqttData.clientId  //Client Id
      );
      //callabacks
      client.onConnectionLost = onConnectionLost;
      client.onMessageArrived = onMessageArrived;

      var options = {
        timeout: 3,
        useSSL:mqttData.ssl,
        onSuccess:onConnect,
        onFailure:doFail
      };

      if(mqttData.username!="" ){
        options.userName=mqttData.username;
        options.password=mqttData.password;
      }

      console.log("TXSS",options);
      client.connect(options);
    };

    function onConnect() {
      sharedUtils.hideLoading();
      console.log("onConnect");   // Hide loading bar
      client.subscribe(mqttData.currentTopic);
    }

    function doFail(e){
      sharedUtils.hideLoading();
      console.log("Error",e);
      sharedUtils.showAlert("Configuration Error","Check if the port is for web-socket!");
      //setTimeout($scope.MQTTconnect, reconnectTimeout);
    }

    // called when the client loses its connection
    function onConnectionLost(responseObject) {
      if (responseObject.errorCode !== 0) {
        console.log("onConnectionLost:"+responseObject.errorMessage);
        sharedUtils.showLoading();
        //setTimeout($scope.MQTTconnect, reconnectTimeout);
      }
    }

    // called when a message arrives
    function onMessageArrived(message) {
      if(Number(message.payloadString)>0) { //-ve number are reserved for notification
        $scope.addPoint(Number(message.payloadString));   // add point to the graph
      }
    }
    /*--------------------------------END OF MQTT---------------------------*/


    /*--------------------------------GRAPH---------------------------*/

    var ISTOffset = 330;   // IST offset UTC +5:30

    var options = {
      chart: {
        renderTo: 'container',
        type: 'spline',
        animation: Highcharts.svg, // don't animate in old IE
        marginRight: 30
      },
      title: {
        text: 'Live Sensor data'
      },
      xAxis: {
        type: 'datetime',
        tickPixelInterval: 150
      },
      yAxis: {
        title: {
          text: 'Value'
        }
      },
      tooltip: {
        formatter: function () {
          return '<b>' + this.series.name + '</b><br/>' +
            Highcharts.dateFormat('%H:%M:%S', this.x) + '<br/>' +
            Highcharts.numberFormat(this.y, 2);
        }
      },
      legend: {
        enabled: false
      },
      exporting: {
        enabled: false
      },
      series: [{
        name: 'Sensor data',
        data: (function () {
              var data = [],
                  time = moment().tz("Asia/Kolkata").valueOf()+(ISTOffset*60000),
                  i;

              for (i = -19; i <= 0; i += 1) {
                data.push({
                  x: time + i * 1000,
                  y: null
                });
              }
              return data;
            }())
      }]

    };

    var chart = Highcharts.chart(options);


    $scope.addPoint = function (point) {
      chart.series[0].addPoint(
          [
            moment().tz("Asia/Kolkata").valueOf()+(ISTOffset*60000),
            point
          ],true,true
      );
    };

    $scope.notify=function(){
      message = new Paho.MQTT.Message("-1"); // -1 => Notify
      message.destinationName = mqttData.currentTopic;
      client.send(message);
    };

    /*--------------------------------END OF GRAPH---------------------------*/

  });
UPDATE: (Configure the Firebase Database accordingly)
1. Update Firebase API variables in index.html
2. Update Firebase URL in service.js
3. Update Firebase DB Rules
{
  "rules": {
    ".read": true,
    ".write": true
  }
}
4. Firebase DB content: Manual entry 😛
5. Firebase Sign-in Method: Email/Password
If you find difficulty in configuring Firebase DB, please refer to the following section in this article : UPDATE (14-07-2016)
FINALLY:

Please read my tutorial series on IOT.
Follow me on Github, to get the latest updates.
UPDATE (26-12-2016):
Video Tutorial for configuring the app :

This is a great tutorial. Thank you. Do you think you will be upgrading the project to Ionic 2 with Angular 2?
LikeLike
Not very soon.
LikeLike
can i ask the explanation for making the android app?so that i don’t have to use localhost when operating the application
LikeLike
Refer :
1. http://www.arjunsk.com/html5/how-to-build-htlm5-app-using-ionic-cordova/
2. http://www.arjunsk.com/html5/improve-speed-ionic-app-using-crosswalk-part-3/
3. http://www.arjunsk.com/html5/html5-basic-terminology-and-concepts/
LikeLike
how if i’m using android studio?could u help me?
i wanna make application in android studio just like yours that can receive sensor data in real time, but i don’t know how to entry the sensor data in graph format
LikeLike